Writing a blog, oh, it’s more than just a few words on a page. In digital marketing, it’s like your first handshake with a reader. People see your posts – yeah, posts, like those long ones on Medium or the tips on Plerdy’s blog – and decide right away if they’re in or out. You wanna pull them in, right? A good blog post can actually do that, make readers stick around, maybe even turn into fans. And don’t worry, you don’t need to be Shakespeare here. Just a clear message, some smart SEO, and boom – you’ve got a post that works. This guide? It’s all about showing you, step-by-step, how to make that happen. Get ready to dive in!
Step 1 – Choosing a Topic and Audience

To make a blog post that actually gets clicks, you need to pick the right topic and know your audience. Think of it like planning a party – you wanna make sure your guests enjoy what you’re serving, or else they’ll leave early. Here’s how to pick a topic that fits your audience and stands out from the endless sea of content.
Identifying Your Target Audience
So, who are you writing for? Bloggers? Small business owners? Marketing pros? Each group has their own thing. For instance, digital marketers wanna know about SEO and content strategies, while e-commerce managers might be focused on better user experience. Get into their minds and find out what questions they’re asking. Check out places like Reddit, LinkedIn groups, or even Quora. Figure out what matters to them, and then you’ll be ready to write a post that speaks their language.
Selecting a Relevant Topic
Once you know who you’re writing for, it’s time to pick a blog topic. Use tools like Google Trends or Answer the Public to find trending topics. These are awesome for seeing what’s hot and what people actually care about right now. Also, check forums – people ask real questions there, and those questions can spark blog ideas. Look for what’s missing from big players like HubSpot or Moz and cover that angle in a way they haven’t.
Conducting Competitor Research
Take a peek at your competition. Who’s already writing on the topic? Check out Neil Patel’s blog or Ahrefs and note what’s working for them. Then, find where they missed the mark. Maybe they didn’t update for the latest trends, or they left out examples. Use that as your chance to shine by adding what they didn’t.
Tools for Topic Research:
- Google Trends – See what’s hot right now
- Quora – Real questions from real people
- Answer the Public – Loads of topic ideas
- Reddit – Niche communities with unique insights
Step 2 – Conducting Keyword Research for Your Blog Post
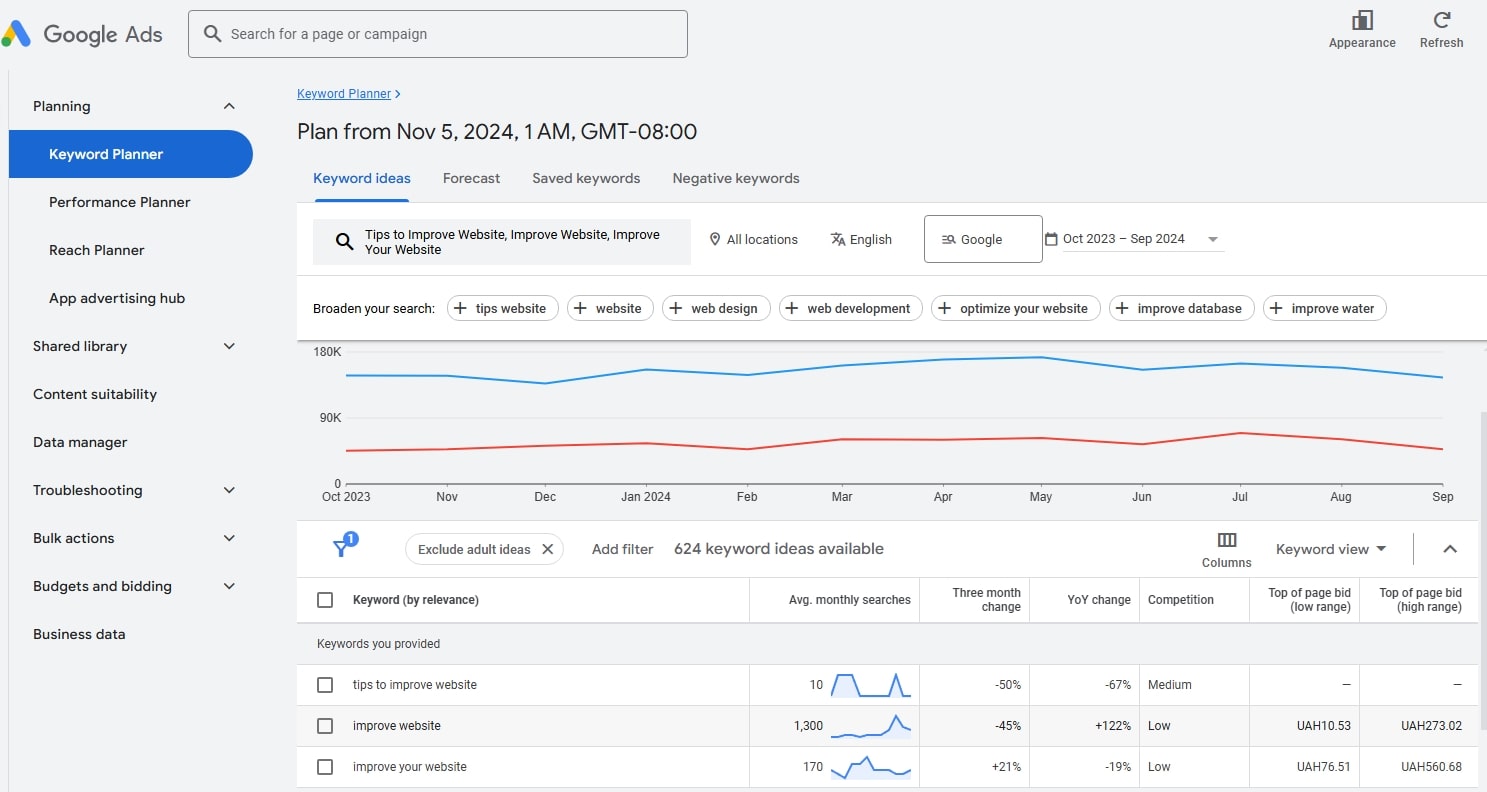
Let’s talk about keywords! They’re the secret sauce to get your blog post seen and loved by your audience. The goal here? Not just to drive traffic but to drive the right traffic to your blog. So, here’s how to find those primary and secondary keywords and the best places to put them in your post for maximum impact.
Finding Primary and Secondary Keywords for Your Blog
First up: finding those solid keywords. Tools like SEMrush and Ahrefs are your go-to here – think of them as your compass for keyword research. Look for keywords with good search volume (people are actually searching for them) but not super high competition (not everyone’s writing a blog post about it). For example, if “blog post SEO” is your primary keyword, you might find secondary ones like “optimize your blog” or “SEO blog tips.” These secondary keywords are like little helpers that boost your blog post’s chances of ranking. And don’t forget about long-tail keywords! These 3-4 word phrases often have less competition and target specific questions readers are asking.
Keyword Placement Strategies to Maximize Blog Post Visibility
Now that you’ve got your keywords, let’s figure out where to place them in your blog post. Think of keywords as the seasoning – sprinkle them around, but don’t overdo it, or your blog post might sound unnatural. Start with your title – it’s the first thing people and search engines see. Add keywords in headings (H1, H2) and sprinkle naturally throughout the blog body. And don’t miss a hidden gem: image alt text. Even your images can help your post rank higher! Just remember, keyword stuffing is a no-go; aim for natural placement that flows with your writing.
Best Practices for Keyword Research:
- Use tools like SEMrush and Ahrefs for finding keywords.
- Look for long-tail keywords (they usually have less competition and high user intent).
- Place keywords in your blog post’s title, headings, body, and image alt text.
- Write naturally – think of keywords as a part of the conversation, not just SEO stuffing.
Incorporate these tips into your next blog post, and watch the traffic roll in!
Step 3 – Creating a Detailed Outline for Your Blog Post
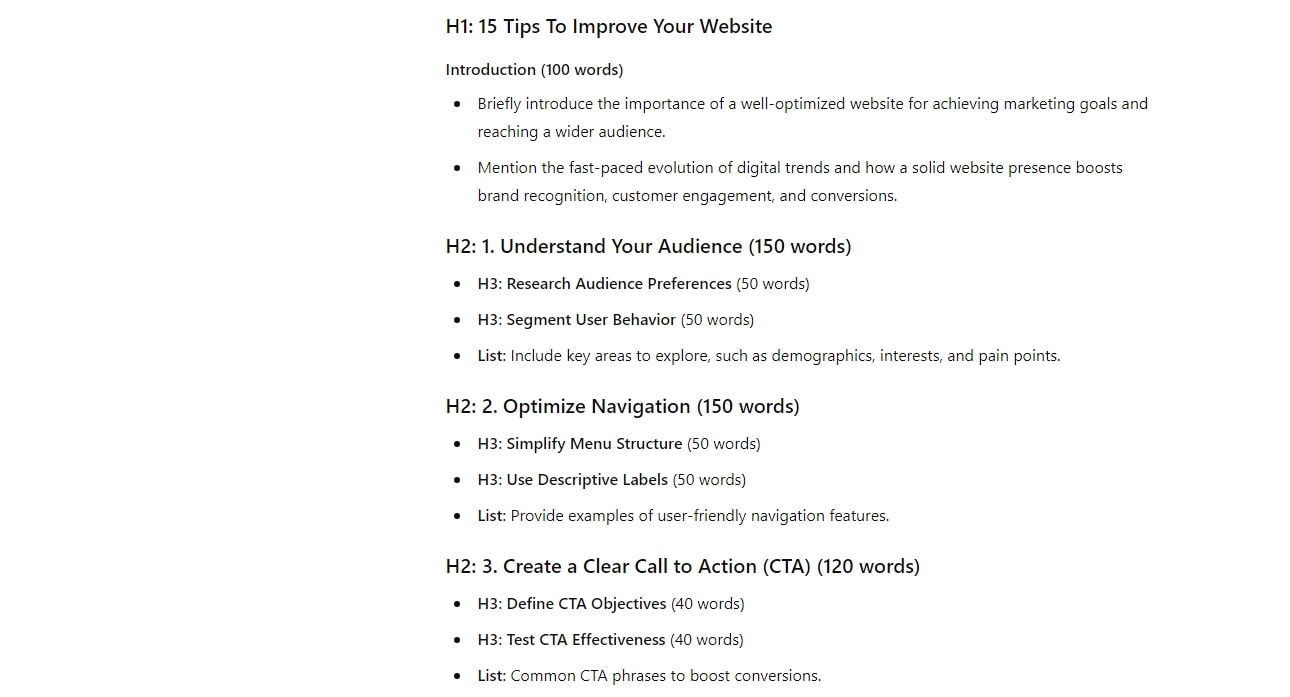
When it comes to writing a blog post, an outline is the game plan. Without one, your post might feel all over the place, confusing readers (and maybe yourself). But with a solid outline, each part of your blog post flows naturally, making your writing easier and faster. So let’s dive into how to organize with headings and structure content flow.
Organizing with Headings for Your Blog
Headings aren’t just for looks – they make your blog post readable and guide your audience smoothly. Start with H2s for the main points. These big topics shape your blog post and give it structure. Under each H2, add H3s to break down the sections even further. This way, instead of a long chunk of text, your readers get clear, digestible sections. Plus, Google loves this organized structure, so your post might even rank better!
Structuring Content Flow to Engage Readers
Your blog post needs to flow like a good story. Start with an engaging intro, then move into the core points, and end with a conclusion or action steps. Think of it like guiding someone through a conversation – each point should connect to the next. This keeps readers hooked until the very end, and they won’t get lost mid-blog. You’re not just writing a post; you’re guiding them through it!
Essential elements in an outline:
- H2 and H3 headings to break down content clearly
- Smooth content flow: intro, main points, and wrap-up
- Data or a quick list for extra reader engagement
With a structured outline, you’ll write your blog post faster and keep your audience engaged – which is a win for everyone!
Step 4 – Crafting an Engaging Title
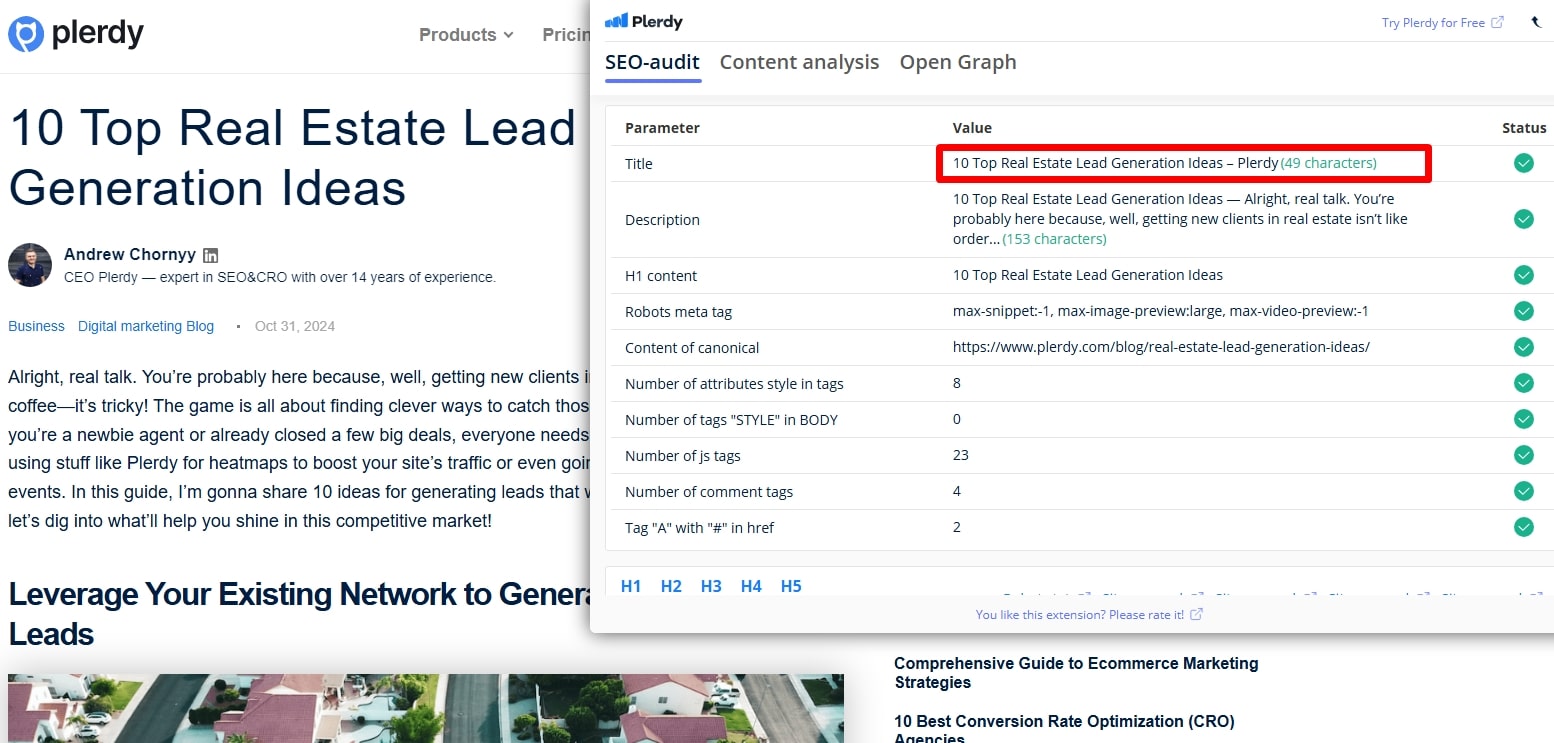
Titles are like that first impression – you get one shot. Make it count. A killer title grabs readers, pulls them in, and makes them think, “Yeah, I need to read this.” Let’s break down what goes into creating one.
Elements of an Effective Title
First up, keep it clear. No guessing games; readers should know what they’re clicking on. Then, add a dash of curiosity – just enough to make them go, “Hmm, interesting.” And don’t forget to be specific. Instead of “Tips for Writing,” go for “10 Game-Changing Writing Tips for Bloggers.” Specificity makes all the difference.
Title Testing and Optimization
Got a title? Awesome. Now test it out. Use tools like CoSchedule’s Headline Analyzer to see if it’s as catchy as you think. These tools give feedback on word balance, length, and emotional impact. Don’t be afraid to tweak till it’s just right. A little polish can take a title from meh to wow.
Examples of engaging blog titles:
- “7 Secrets to Boosting SEO That Google Won’t Tell You”
- “How to Create Content That Drives 10x Traffic”
- “The Ultimate Guide to Blog Success in 2024”
Step 5 – Writing the Introduction for Your Blog Post

Creating a great intro can make or break your blog post. Think of it like the first scene of a movie – if it’s boring, people won’t stick around. Let’s make your readers want to keep reading.
Hooking the Reader
Start with something juicy. Ask a question, share a surprising stat, or tell a quick story. Something that pulls them in, fast! “Did you know that 70% of blogs don’t get read beyond the first few lines?” Now they’re curious, right? This is how you grab their attention.
Setting Expectations
Now, tell them why they should stick around. Briefly hint at what they’ll learn or gain. “In this blog post, you’re gonna discover the top tricks for writing intros that work – even if you’re new to blogging.” Make them feel it’s worth their time to read the full post.
Step 6 – Writing the Main Body of Your Blog Post
So, you’re in the thick of it now – the main body of your blog post. This is where the real magic happens, where you get to share the goods and keep readers hooked. Let’s make sure they’re not just skimming but truly engaged!
Providing Valuable Content
Here’s your chance to deliver real value. Don’t just fill space; give them something they can actually use! Share actionable advice – think step-by-step tips, real-life examples, or even a funny story that makes the point stick. People love hearing about experiences that feel genuine. Say you’re writing about improving site traffic – share a story on how you (or maybe “Company X”) tried a small tweak and got 20% more visitors in just a week. See? That’s something memorable!
Using Lists and Visuals
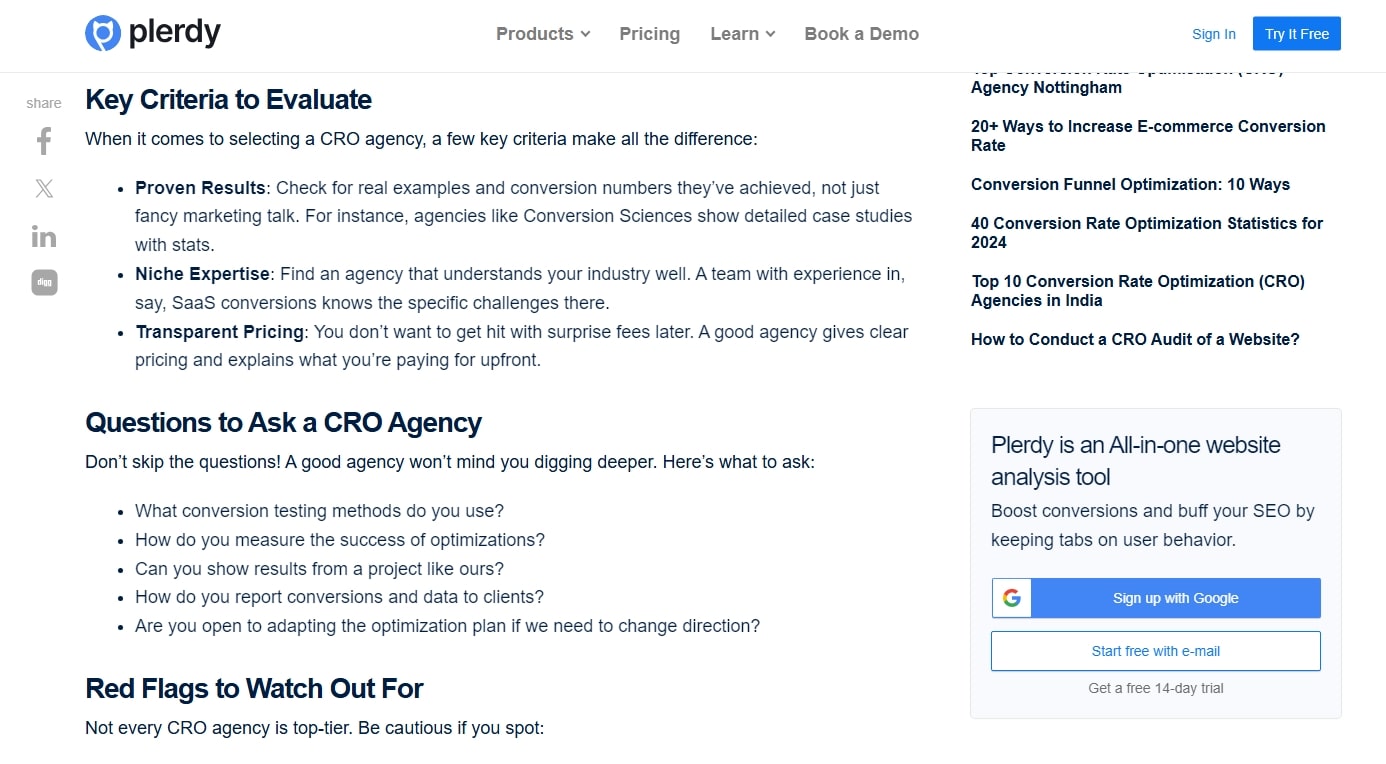
Nothing turns a long blog post into something readable like a good list. Lists make it easy for readers to follow your points. Plus, visuals like images, charts, and screenshots break up the text and help readers understand complex stuff. A picture or chart can say so much with so little effort. If you’re writing about SEO, a quick screenshot from Ahrefs or SEMrush can show exactly what you mean. A reader’s eyes love these breaks – so use them!
Types of visual aids:
- Screenshots of tools in action (like Ahrefs, SEMrush)
- Infographics that summarize key points
- Charts to display stats or comparisons
- Bullet lists (like this one!) for easy-to-read points
Maintaining Consistent Tone and Flow
Keep the tone of your blog post consistent. If you started off casual, stay that way. Your reader won’t expect sudden formality in a conversational post. Adjust based on who’s reading – light and fun for beginners, more direct for seasoned pros. A smooth flow from one point to the next keeps them reading. Don’t jump around too much; keep each section connected so they can follow your train of thought.
Write naturally, let your personality shine, and make sure the post feels like you’re talking directly to them – it’s what keeps readers coming back for more!
Step 7 – Adding SEO Elements to Your Blog Post

SEO is like the secret sauce to make your blog post shine. These little elements? They’re what make Google notice you. And trust me, when you do it right, your blog will get more love in the search results.
Meta Descriptions and Alt Text
Meta descriptions – it’s like the short pitch for your post that pops up in search. It should be catchy, around 150 characters, and give a taste of what readers get from your post. Now, don’t skip the image alt text. Not only is it helpful for accessibility, but it’s also another chance to sneak in those keywords. Got an image? Describe it with alt text – helps both users and SEO.
Internal and External Links
Linking is golden! Internal links guide readers to more of your posts, keeping them on your blog longer. Plus, it builds authority. External links to trusted sources? They show Google you’re serious and know your stuff. Imagine writing about SEO tools and linking to big ones like Moz or SEMrush – it’s like a little endorsement!
SEO practices to include in every post:
- Craft a strong meta description
- Add alt text to all images
- Link to other posts on your blog (internal links)
- Use external links to credible sources
Step 8 – Editing and Proofreading Your Blog Post
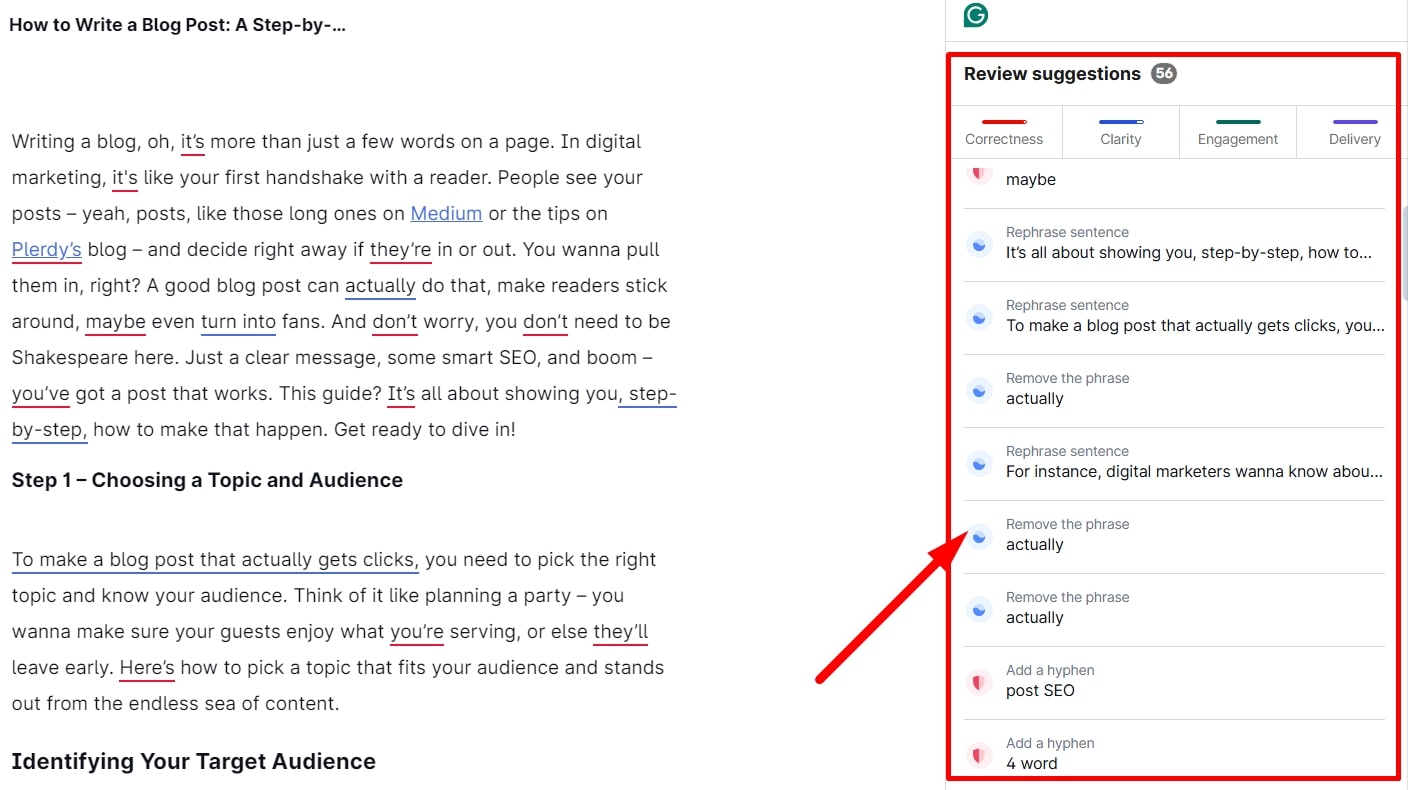
Editing is the magic that makes your blog post go from “okay” to “outstanding.” You’ve already put in the effort to write it, but polishing is what makes readers stick around. Even if grammar isn’t your best skill, tools and feedback will bring your writing up a notch. Remember, a solid edit is a must for any blog post!
Tips for Self-Editing
Use tools like Grammarly or Hemingway Editor to catch grammar errors and improve readability. Grammarly finds style issues, while Hemingway helps simplify the blog text. These tools help, but don’t rely on them completely. Try reading your blog post out loud—sometimes you catch mistakes you wouldn’t see on screen.
Seeking Feedback
A fresh perspective can do wonders for your writing. Send your blog draft to a friend or colleague for feedback. They can point out things you missed and maybe even suggest new ideas. Getting a second opinion on your blog post can only make it better—don’t skip this!
Editing tools and resources:
- Grammarly – grammar and style checker for blog posts
- Hemingway Editor – helps make your writing clear and simple
- Google Docs Suggestions – makes it easy to review blog edits with others
Step 9 – Publishing and Promoting the Blog Post You Wrote

After you write that blog post, publishing isn’t just a quick click on “post” and done. There’s a bit more to it! Timing, settings, and clever promotion are key to making sure your blog reaches the right readers. Here’s how to give the blog post you wrote the attention it deserves.
Publishing Best Practices
When you’re ready to publish, think about timing. Studies say that blog readers are most active mid-week, around Wednesday or Thursday mornings. So, write it down in your content plan, or use a platform like WordPress to schedule if you won’t be online. Before you hit “publish,” check all SEO settings—meta descriptions, tags, and keywords make a big difference for search engines and readers. These little tweaks help your written content shine in search results.
Promotion Strategies
Now that you’ve published your written masterpiece, it’s time to promote. Email marketing is a great way to let subscribers know about the new post you’ve written. Social media is also perfect for sharing your blog. Post it on LinkedIn, Twitter, or wherever your audience hangs out. And don’t forget SEO. Link back to this post from other pages on your site—it gives your new blog a bit of extra love and helps boost traffic.
Promotion channels:
- Email newsletters – Directly reach those who follow your blog.
- Social Media – Platforms like Facebook, LinkedIn, Twitter.
- SEO – Internal linking, optimized descriptions, and meta tags.
- Guest posts – Share your writing on other blogs to broaden your reach.
Step 10 – Analyzing the Performance of Your Blog Post
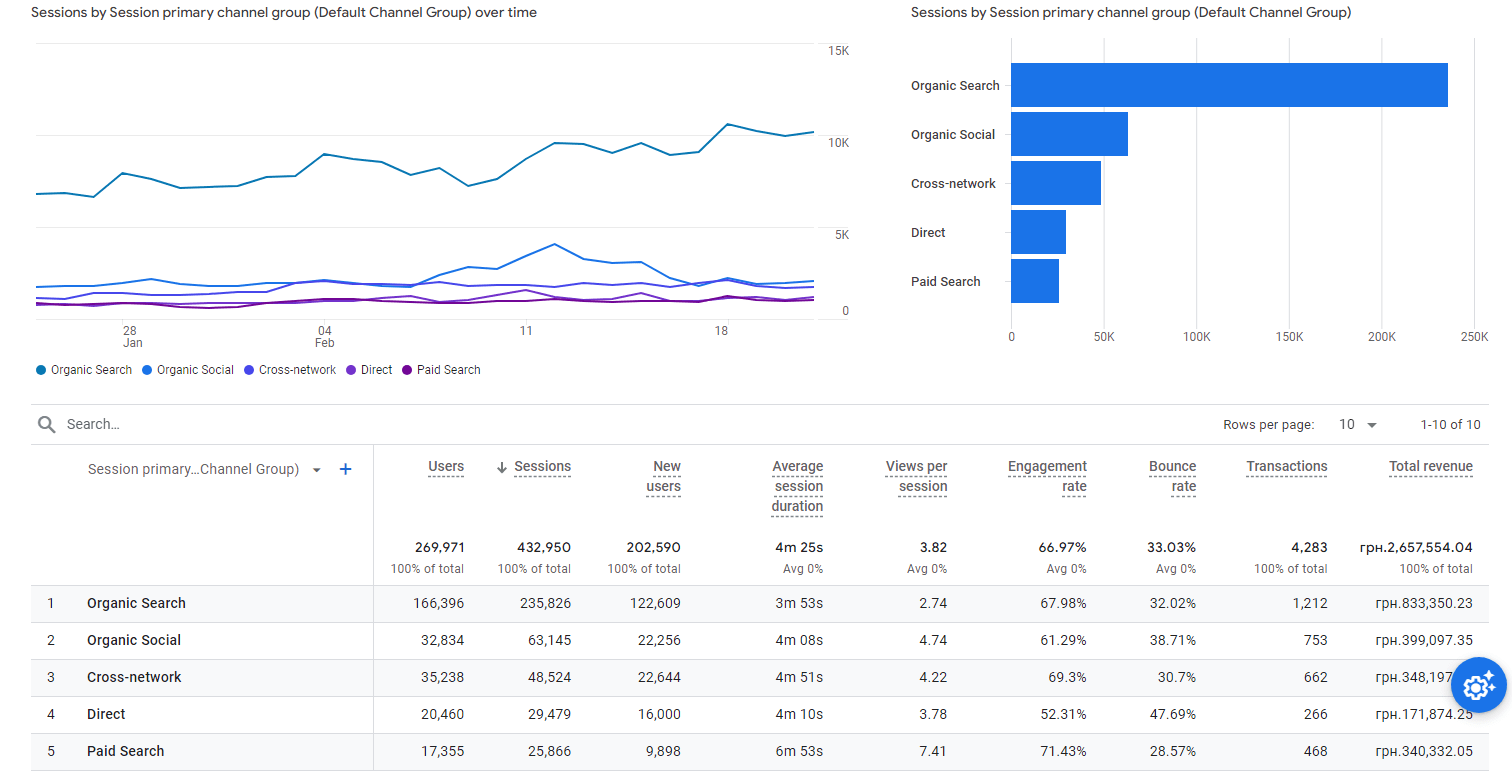
After you write and publish, there’s one more thing: analysis. How did the post you worked on actually do? You gotta know if it’s reaching people, right? Checking out your blog post performance isn’t just about views—there are some juicy numbers that reveal way more.
Key Metrics to Track
A few key metrics tell the story. Start with CTR (Click-Through Rate) to see if people are clicking on the post link. Bounce rate shows how many visitors left right after reading, and time on page tells if they’re really into what you wrote or just skimming. These metrics help you understand what’s grabbing your readers and what might need tweaking.
Tools for Analysis
For tracking, Google Analytics is the go-to. It’s free, reliable, and shows all the data you need for post analysis. Other tools like SEMrush can offer extra insights, especially for SEO performance. These help you refine how you write, knowing what works best.
Essential metrics for blog performance tracking:
- Click-Through Rate (CTR) – Shows if the headline is catching eyes.
- Bounce Rate – Reveals if readers are sticking around.
- Average Time on Page – Tells if they’re actually reading the post.
- Social Shares – Checks if readers find it worth sharing.
Writing Style Tips to Avoid AI Detection
So you wanna write like a real person, not some robot! Here’s how: start by mixing up your sentence structures—short, long, maybe even throw in a question. AI detection catches onto those patterns fast, so avoid sounding too perfect or repeating the same phrases. Try adding personal touches, like your own insights or real examples. For instance, if you’re writing a blog for Plerdy, mention something relatable, like a recent trend or a specific tool. Adding data points or percentages (e.g., “Over 70% of readers…” ) also makes it sound more legit.
Quick Tips:
- Use various sentence lengths and styles.
- Throw in personal stories or examples.
- Sprinkle in real numbers or data.
Remember, authenticity is key! You don’t need to write flawlessly—just keep it real, and readers will connect with it.
Conclusion
Alright, so you made it! Now you got all the steps to write a solid blog post—from finding that killer topic to hitting “publish.” Just remember, writing’s like a muscle. The more you write, the better you get. Consistency is key here; keep your posts coming, and your audience will stick around.
And don’t stress if it’s not perfect. Most readers just want real, helpful content. So keep that focus on them, tweak a bit with every post, and soon enough, you’ll see results. Tools like Plerdy can help track what’s working (or not) and guide you in real-time to improve.
